通常我們去某個文章的頁面,文章的版面都會是一樣的,只有內容不一樣
這個時候網址會是後面帶一個該文章的主鍵ID,例如:/content/主鍵ID
然後我們程式在依據這個ID取得對應的內容,那在Angular裡要如何取得這個ID呢?
這邊已經我先把必要的頁面先做好了,如果要照著範例做,可以先下載初始範例檔
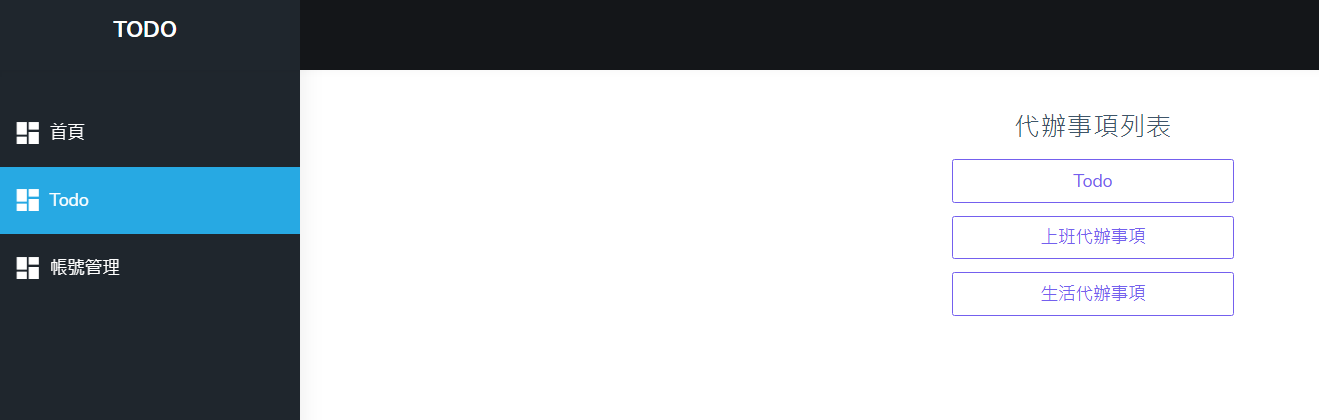
這個範例要來示範,我這邊會有很多待辦事項主題,各個主題會有自己的代辦事項
這邊我先做好了三個主題,之後點進去後要分別取得自己的代辦事項
那這邊有做了一支新的API(todo6_5),因為多了一個群組的概念,傳遞的參數也會有所不同,所以我們要先改一下todo-api.service.ts
import { HttpClient } from '@angular/common/http';
import { Injectable } from '@angular/core';
import { Todo } from '../@models/todo.model';

@Injectable({
  providedIn: 'root'
})
export class TodoApiService {
  private url = '/api/todo6_5';

  constructor(private http: HttpClient) { }

  取得資料(id: string) {
    return this.http.get<Todo[]>(this.url + '/' + id);
  }

  新增(value: Todo) {
    return this.http.post<Todo>(this.url, value);
  }

  修改(value: Todo) {
    return this.http.put(`${this.url}/${value.TodoId}`, value);
  }

  刪除(value: Todo) {
    return this.http.delete(`${this.url}/${value.TodoId}`);
  }

  全部狀態統一(value: boolean, id: string) {
    return this.http.put(`${this.url}/Status/${id}/${value}`, null);
  }

  刪除已完成事項(id: string) {
    return this.http.delete(`${this.url}/clearCompleted/${id}`);
  }

}
那其他地方有使用到以上修改的參數也要先做一些修改,程式才能運作,這邊大家可以先試著看著錯誤訊息找到要修改的地方
todo.service.ts
import { Injectable } from '@angular/core';
import { Todo, TodoClass, TodoStatusType } from '../@models/todo.model';
import { TodoApiService } from './todo-api.service';

@Injectable({
  providedIn: 'root'
})
export class TodoService {
  toggleAllBtn = false;
  nowTodoStatusType = TodoStatusType.All;
  todoDataList: Todo[] = [];
  gid = '';

  get nowTodoList() {
    let list: Todo[] = [];

    switch (this.nowTodoStatusType) {
      case TodoStatusType.Active:
        list = this.todoActive;
        break;
      case TodoStatusType.Completed:
        list = this.todoCompleted;
        break;
      default:
        list = this.todoDataList;
        break;
    }

    return list;
  }

  get todoActive(): Todo[] {
    return this.todoDataList.filter(data => !data.Status);
  }

  get todoCompleted(): Todo[] {
    return this.todoDataList.filter(data => data.Status);
  }

  constructor(private todoApiService: TodoApiService) { }

  getData() {
    this.todoApiService.取得資料(this.gid).subscribe(data => {
      this.todoDataList = data;
      this.ready();
    });
  }

  ready() {
    this.todoDataList.forEach(data2 => {
      data2.CanEdit = true;
      data2.Editing = false;
    });
    this.checkToggleAllBtn();
  }

  add(value: string) {
    const seqno = new Date().getTime();
    const todo: Todo = new TodoClass(value, false, seqno);
    todo.GroupId = this.gid;
    this.todoDataList.push(todo);
    this.todoApiService.新增(todo).subscribe(data => {
      this.todoDataList.forEach(data2 => {
        if (data2.Seqno === seqno) {
          data2.TodoId = data.TodoId;
          data2.CanEdit = true;
        }
      })
    });
  }

  update(item: Todo) {
    this.todoApiService.修改(item).subscribe();
    item.Editing = false;
  }

  clickCheck(item: Todo) {
    item.Status = !item.Status;

    this.todoApiService.修改(item).subscribe();
    this.checkToggleAllBtn();
  }

  delete(item: Todo) {
    this.todoApiService.刪除(item).subscribe();
    this.todoDataList = this.todoDataList.filter(data => data !== item);
  }

  toggleAll() {
    this.toggleAllBtn = !this.toggleAllBtn;
    this.todoDataList.forEach(data => {
      data.Status = this.toggleAllBtn;
    });

    this.todoApiService.全部狀態統一(this.toggleAllBtn, this.gid).subscribe();
  }

  clearCompleted() {
    this.todoApiService.刪除已完成事項(this.gid).subscribe();
    this.todoDataList = this.todoActive;
  }

  checkToggleAllBtn() {
    if (this.todoCompleted.length === this.todoDataList.length) {
      this.toggleAllBtn = true;
    } else {
      this.toggleAllBtn = false;
    }
  }

  setTodoStatusType(type: number) {
    this.nowTodoStatusType = type;
  }


}
接著我們看到路由的設定,這邊我已經先寫好了
todo-routing.module.ts
const routes: Routes = [
  { path: 'list', component: TodoListComponent },
  { path: 'content/:id', component: TodoContentComponent },
  { path: '', redirectTo: 'list', pathMatch: 'full' }
];
其中:id,就是準備要傳參數的地方的寫法,一個:加上自訂變數
接著我們就要到todo-list.component.html改一下參數的網址
<div class="cen">代辦事項列表</div>
<div class="mar5" *ngFor="let item of dataList">
  <a [routerLink]="['../content',item.GroupId]" type="button" class="btn btn-outline-primary">
    {{item.Name}}
  </a>
</div>
接著我們就要到todo-content.component.ts中來取得Id,那這邊會注入一個ActivatedRoute,一個可以取得參數的服務
constructor(private todoService: TodoService,private route: ActivatedRoute) { }然後我們在init中去訂閱取得
ngOnInit() {
  this.todoService.todoDataList = [];
  this.route.paramMap.subscribe(data => {
    this.todoService.gid = data.get('id') as string;
    this.todoService.getData();
  });
}其中data.get('id')的id就是我們路由中自訂的參數名稱,後面有個as string 是因為有可能是null,為了讓編譯可同過強行轉string
接著我們進到todo頁面就可以看到todo的代辦事項了
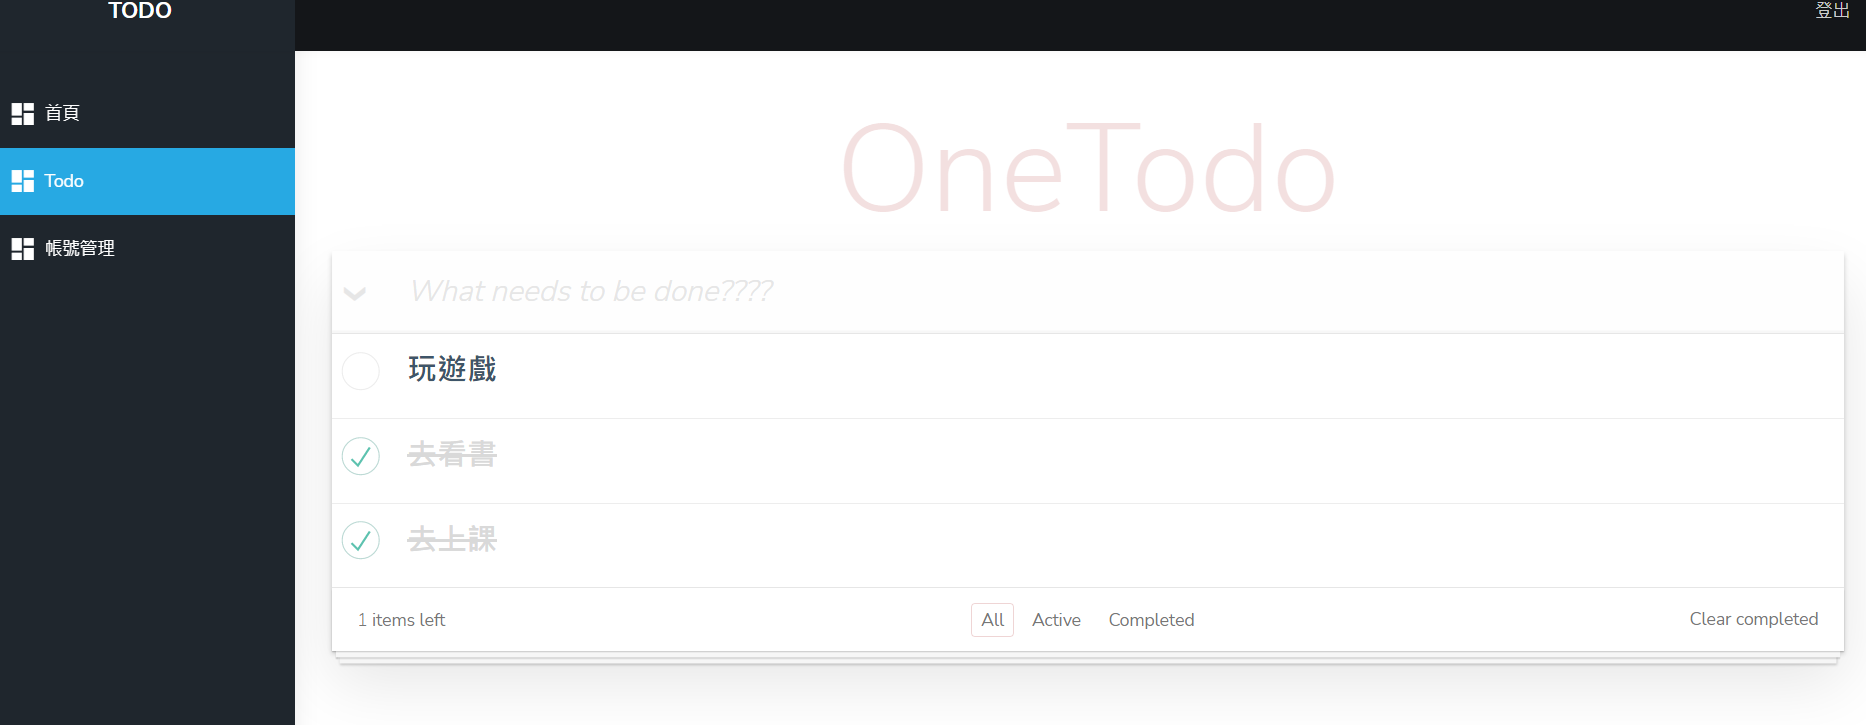
而其他兩個,則不會有內容,我們可以分別在不同的代辦事項新增東西是否能成功運作
那基本上沒什麼問題,接著再教另一種取得的方式如下
ngOnInit() {
  this.todoService.todoDataList = [];
  this.todoService.gid =this.route.snapshot.paramMap.get('id') as string;
  this.todoService.getData();
}
但這個用法要小心,如果擺在ngOnInit裡,是初始化才會執行,如果你是在這一頁直接轉換不同id的這一頁
將不會執行ngOnInit,而不會執行,就不會取到正確的資料,用講得不好講,影片會示範
而訂閱的方式只要數值有變更,就會執行,所以不會有這個問題
範例檔:下載