首先我們先建立一個新的元件,並透過本地變數從父元件呼叫子元件的方法
todo-info-modal來建立一個明細的功能,以下是bootstrap的modal的html
todo-info-modal.component.html
<div class="modal fade" id="todoInfoModal" tabindex="-1" aria-labelledby="exampleModalLabel" aria-hidden="true">
  <div class="modal-dialog">
    <div class="modal-content">
      <div class="modal-header">
        <h5 class="modal-title" id="exampleModalLabel">代辦事項明細</h5>
        <button type="button" class="btn-close" data-bs-dismiss="modal" aria-label="Close"></button>
      </div>
      <div class="modal-body">

      </div>
      <div class="modal-footer">
        <button type="button" class="btn btn-secondary" data-bs-dismiss="modal">關閉</button>
      </div>
    </div>
  </div>
</div>
接著在todo-info-modal.component.ts寫上彈跳出來的程式碼show()
import { Component, Input, OnInit } from '@angular/core';

@Component({
  selector: 'app-todo-info-modal',
  templateUrl: './todo-info-modal.component.html',
  styleUrls: ['./todo-info-modal.component.scss']
})
export class TodoInfoModalComponent implements OnInit {
  todoInfoModal: any;

  constructor() { }

  ngOnInit(): void {
  }

  show() {
    if (!this.todoInfoModal) {
      this.todoInfoModal = new bootstrap.Modal(document.getElementById('todoInfoModal'), {
        keyboard: false
      });
    }
    this.todoInfoModal.show();
  }
}
將此app-todo-info-modal標籤放入section.component.html中,並加入範本變數modal
<app-todo-info-modal #modal></app-todo-info-modal>接著我們再做一個info的按鈕,並加入點擊事件
<button (click)="modal.show()"
*ngIf="item.CanEdit"
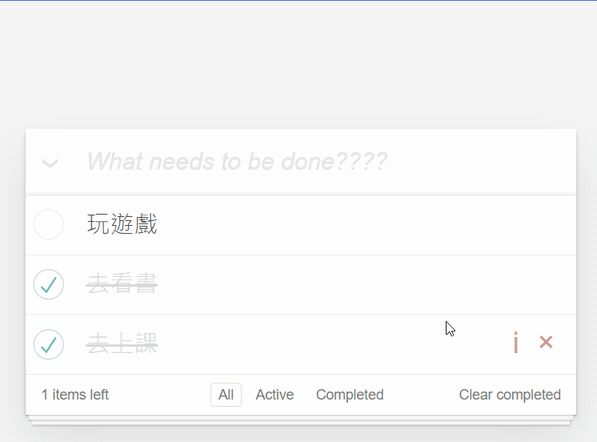
class="destroy2">i</button>到這邊後就會有以下效果
所以透過這個方式,我們可以從父元件很簡單的去使用子元件的方法
接著我們在app-todo-info-modal再加上一個Input窗口
@Input() todo!:Todo然後在html規劃好明細的顯示格式
<div class="modal fade" id="todoInfoModal" tabindex="-1" aria-labelledby="exampleModalLabel" aria-hidden="true">
  <div class="modal-dialog">
    <div class="modal-content">
      <div class="modal-header">
        <h5 class="modal-title" id="exampleModalLabel">代辦事項明細</h5>
        <button type="button" class="btn-close" data-bs-dismiss="modal" aria-label="Close"></button>
      </div>
      <div class="modal-body">
        <div>id:{{todo.TodoId}}</div>
        <div>事情:{{todo.Thing}}</div>
        <div>完成:{{todo.Status?'是':'否'}}</div>
        <div>建立日期:{{todo.CreateTime | date:'yyyy-MM-dd'}}</div>
      </div>
      <div class="modal-footer">
        <button type="button" class="btn btn-secondary" data-bs-dismiss="modal">關閉</button>
      </div>
    </div>
  </div>
</div>
修正一下section.component.html,加入nowSelectTodo並丟給app-todo-info-modal
<button (click)="modal.show();nowSelectTodo=item" *ngIf="item.CanEdit" class="destroy2">i</button>

<app-todo-info-modal [todo]="nowSelectTodo" #modal></app-todo-info-modal>
看似沒問題了,但程式卻發生錯誤
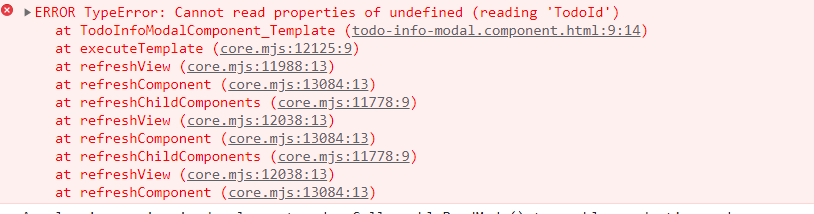
原因就在於一開始app-todo-info-modal裡的todo是沒有值的,因此碰到下面要讀取他的值時會錯誤
<div>id:{{todo.TodoId}}</div>
<div>事情:{{todo.Thing}}</div>
<div>完成:{{todo.Status?'是':'否'}}</div>
<div>建立日期:{{todo.CreateTime | date:'yyyy-MM-dd'}}</div>
這時我們可以用ngIf來做簡單的防呆工作
<div class="modal-body">
  <div *ngIf="todo">
    <div>id:{{todo.TodoId}}</div>
    <div>事情:{{todo.Thing}}</div>
    <div>完成:{{todo.Status?'是':'否'}}</div>
    <div>建立日期:{{todo.CreateTime | date:'yyyy-MM-dd'}}</div>
  </div>
</div>
這樣如果在外層的ngif=false的時候,就不會執行裡面div的內容,自然就不會發生錯誤了
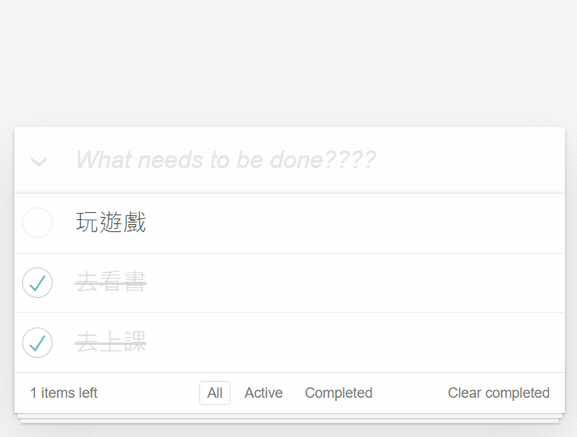
這算是一個小技巧,最後執行畫面如下
其實這才是Input的最佳使用情境,因為相當的單純,就是我建立好一個模板後
外部再傳值進來,模板便將傳進來的值套好,情境相當直覺
就是這種直覺型的工作,才會使用Input或Output作業,否則會使用service來溝通為佳
所以要用一個寫法之前,要先選擇正確的撰寫方式,不然反而事倍功半
範例檔:下載